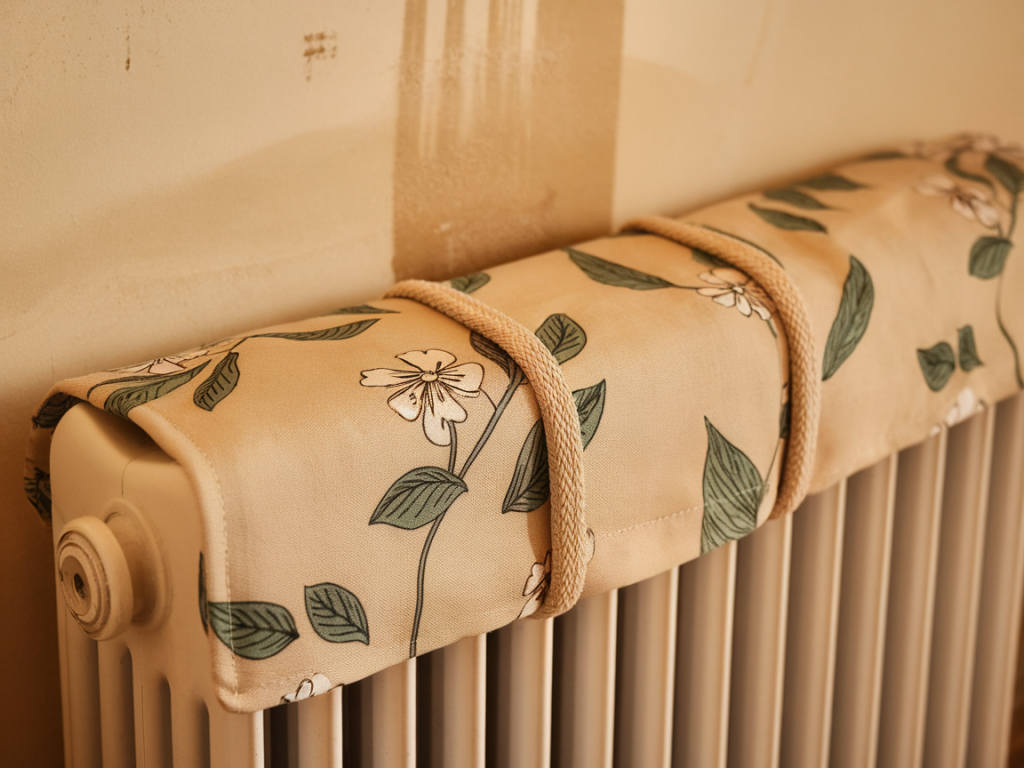
I had a stubborn, pale yellow stain spread across the lower panel of my living room radiator for months. As a renter I didn’t want to repaint (and I wasn’t allowed to), but every time I sat down the stain caught my eye. I ended up making a simple fabric radiator cover that took me about 30 minutes, cost almost nothing, and is completely removable — no nails, no paint, no damage. If you have a similar problem, here’s a gentle, renter-friendly solution you can try.
Why a fabric cover?
A fabric cover feels soft, quick, and reversible. Unlike bulky wooden covers, a sewn panel keeps heat flow largely unaffected, is easy to remove for cleaning or inspections, and hides stains without permanent changes to the radiator. I find it sits well in a lived-in space — it’s practical and quietly pretty.
What you’ll need
Lightweight cotton or linen fabric (about 40–50cm / 16–20in wide per radiator section; see table below)Velcro tape (self-adhesive or sew-on) or fabric tiesMeasuring tape or rulerScissorsSewing needle and thread or a basic sewing machine (optional — great if you want neater edges)Iron (optional) and pinsHeat-safe gap: make sure to leave at least 2–3cm / 1in clearance from the radiator surface if it gets very hotIf you don’t sew, no worries — you can use fabric glue or a no-sew hem tape (like Hemline or similar). I used a small piece of cotton from an old curtain and some adhesive Velcro from a craft store; the whole thing cost under £5.
Quick sizing guide
Measure the width of the radiator from one side to the other and the height from the top edge of the radiator panel to where the heat fins finish (or to the floor, if you prefer a longer cover). Add about 2cm / 0.8in to each side for seams or fold-over. Here’s a simple table showing fabric lengths for common radiator widths:
| Radiator width | Fabric width to cut (include seam allowance) | Fabric height |
| 60 cm (small) | 64 cm | Height of radiator + 4 cm |
| 100 cm (medium) | 104 cm | Height of radiator + 4 cm |
| 140 cm (large) | 144 cm | Height of radiator + 4 cm |
Step-by-step: make the cover in 30 minutes
This is the exact method I used. It’s fast, reversible, and doesn’t require professional tools.
Prepare the fabric: Cut your fabric to the size from the table above. If using a patterned fabric, check the direction so the pattern reads the right way up.Hem the edges: Fold a small hem (about 1–2cm) along all sides and pin. If you’re sewing, a simple straight stitch is fine. No-sew: use iron-on hem tape or fabric glue. I prefer the sewn look because it’s more durable — especially if you’ll be taking the cover on and off frequently.Create top tabs: To hold the cover in place without drilling, make three or four small tabs along the top edge. Cut strips from the same fabric (about 5cm wide and 10–12cm long), fold them in half lengthwise, stitch or glue them into tubes, and attach them evenly across the top edge. When the top tabs are folded over the radiator top panel, they hold the cover in place by friction.Attach Velcro (optional): If your radiator has a lip or a bare metal top, you can use self-adhesive Velcro strips to anchor the tabs. Stick one side of the Velcro to the radiator top (press firmly) and the corresponding piece to the inside of each fabric tab. Make sure the radiator is cool and clean before applying adhesive Velcro.Fit the cover: Slip the tabs over the radiator top or attach the Velcro pieces. Adjust so the fabric hangs straight and hides the stain. If the radiator heats significantly, make sure every material you used (especially the adhesive) is rated for warmth and won’t melt.Safety and heat considerations
Radiators can get hot. I always check how warm mine gets before leaving a fabric cover on long-term. A couple of simple precautions:
Leave a small air gap: Don’t press the cover flush against hot metal. A 1–3cm gap helps air circulate and reduces the risk of fabric overheating.Use natural fabrics: Cotton, linen, or wool handle heat better than synthetics. Avoid thin polyester that can melt or smell when warm.Detach at high heat times: If you use heavy-duty heating occasionally, remove the cover for full heating cycles or during drying times to prevent moisture buildup between fabric and metal.Check adhesive limits: Some self-adhesive Velcro isn’t meant for sustained heat. I used a sew-on option on my radiators and just removed the Velcro when necessary.Design ideas to blend the cover into your home
One of my favourite things about this simple cover is how easily it changes the room’s mood. A few ideas:
Pick a neutral linen for a calm, French-inspired look (I often choose natural linen for this blog).Use a patterned cotton to bring a pop of colour — small floral or striped prints make radiators feel intentional rather than hidden.Add a narrow trim or ribbon along the bottom edge for a subtle detail.Stencil a minimal motif (dots, hearts, or lines) if you like a crafted look — use fabric paint that’s heat-safe.Maintenance and longevity
I wash my radiators’ fabric covers in a cool, gentle cycle and air-dry them. If you used Velcro or tabs, remove those components first. Replace a cover seasonally if it becomes faded or dusty — they’re quick to make.
If you live somewhere with high humidity, check behind the cover occasionally for condensation or dust accumulation. Wipe the radiator surface with a dry cloth when the cover is off to keep everything fresh.
Alternative nosew options
If sewing isn’t your thing, here are a couple of alternatives I’ve tried or recommended to friends:
Drape a large tea towel and tuck it into the radiator top — very fast but less neat.Use fabric adhesive Velcro strips directly around the radiator top and a pre-cut fabric panel with matching Velcro. This is tidy and fully removable but depends on adhesive quality.Buy a ready-made radiator scarf (sold by brands like John Lewis or independent Etsy makers) — quicker but more costly.Making a simple fabric radiator cover felt like a tiny act of reclaiming my space: it hid the stain, softened the room, and didn’t cost much or involve permission from my landlord. If you try it, I’d love to hear how you adapted the method — send a photo or drop a note on the blog at https://www.restoringdaisy.co.uk. Small changes like these keep home feeling calm and cared-for, one modest step at a time.