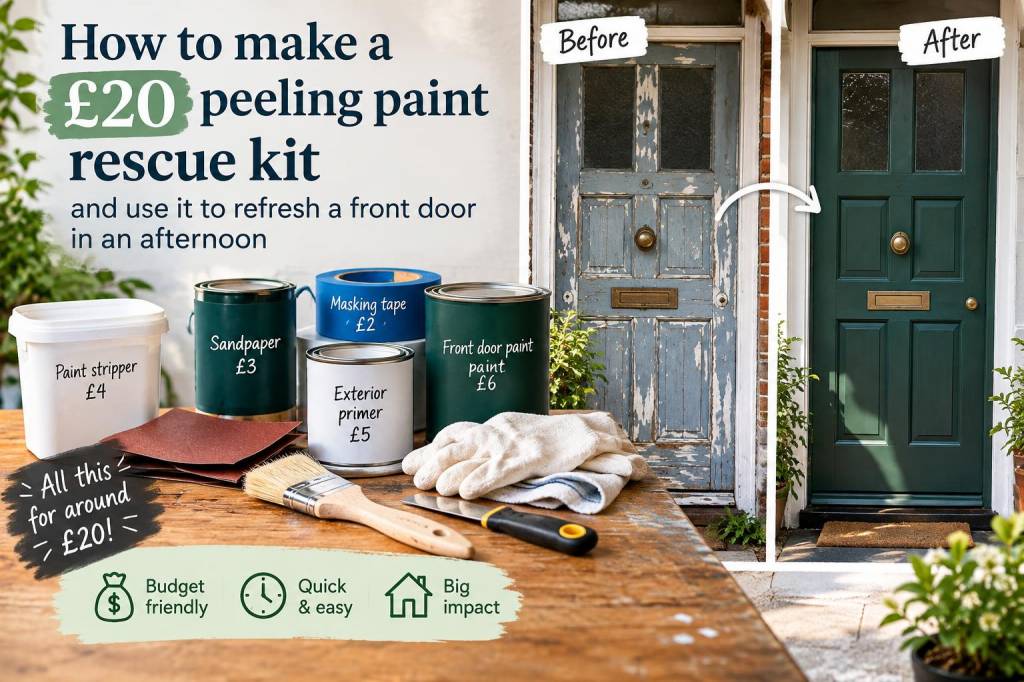
I remember the first time I tackled peeling paint on our front door: I felt a little daunted, but also oddly excited. A fresh-looking entrance can lift an entire street-facing corner of a home, and you don't need to spend much to get a professional-looking result. Over the years I’ve learned that a small, well-chosen kit and an afternoon of focused work can turn a tired door into something welcoming. Here’s how I put together a £20 peeling-paint rescue kit and used it to refresh a front door in a single afternoon for Restoring Daisy readers.
What you’ll need (and why)
Before you rush to a DIY store, know that careful prep beats expensive products. My kit is deliberately minimal and budget-friendly. If you already own a few basic tools, you may spend even less.
- Medium-grit sandpaper (120–150) — for initial smoothing and removing loose paint. I buy a pack of mixed sheets for around £2.
- Fine-grit sandpaper (220) — for feathering edges and smoothing between coats. Usually about £1–£2.
- Fillers: exterior wood filler or ready-mixed filler — to repair any deep cracks or gouges. A small tub costs about £3–£4.
- Decorator’s filler knife or small spatula — essential for applying filler cleanly (under £2).
- All-purpose scraper — to remove flaking and loose paint. A plastic scraper can be cheap; for stubborn layers, a metal one (around £3) is worth it.
- Primer/undercoat (small pot) — a cheap but reliable exterior primer is key for adhesion. I look for a small tub suitable for metal or wood depending on my door; budget about £5–£7.
- Small brush and mini roller — a 1–2 inch angled brush for trims and a small foam roller for panels make the finish neat. Together around £3–£4.
- Masking tape and a dust sheet or newspaper — to protect glass and hardware, about £1–£2.
If that adds up to slightly over £20, consider borrowing tools like a metal scraper or buying second-hand; local community tool libraries are great for this. I keep my kit in an old tote bag so it’s always ready for quick updates.
Prep: small changes, big difference
Good prep is where most of the work happens. I schedule this on a dry, calm day — damp weather ruins adhesion and makes sanding dusty and sticky.
- Start by wiping the door down with a damp cloth to remove surface dirt and cobwebs.
- Protect glass, letterbox, and hardware with masking tape. If your handle and mail slot are brass and you'd rather not mask, consider removing them briefly with a screwdriver.
- Lay a dust sheet or newspaper at the base of the door.
With everything protected, use your scraper to gently lift and remove loose paint. I work outward from the worst areas and avoid forcing stubborn patches — if a layer is stubborn, a brief sanding will usually finish the job without gouging the wood.
Sanding and filling: make the surface sing
After scraping, I sand with medium-grit paper to feather the edges of remaining paint and smooth transitions. If the door has raised panels, run the sandpaper along the grain to keep things neat.
For holes and deeper cracks, apply a little exterior filler with the knife, pressing firmly and cleaning the edges so the filler sits flush or slightly proud (you can sand it back). Let it dry — drying times vary, but a small tub often sets in 20–45 minutes.
Once dry, sand the repaired areas with fine-grit paper until they’re smooth and blend with the surrounding paint. A quick wipe with a damp cloth removes dust and leaves a clean surface for priming.
Priming and painting: choice and technique
Primer is the glue that helps your new paint stick — don’t skip it. For timber doors, a universal exterior primer is fine; if your door is metal, choose a metal-specific primer. I use a small, reliable brand like Cuprinol or Johnstone’s for good coverage without breaking the bank.
Apply a thin, even coat with your brush for corners and a mini roller for panels. Thin coats dry faster and look smoother. Let the primer dry fully (check the tin; usually 1–2 hours in warm weather). If the wood was very thirsty or patchy, a second quick coat of primer makes the finish more durable.
For the topcoat, I favour an all-weather exterior gloss or satin finish depending on the look I want. Gloss is forgiving and easier to wipe clean; satin feels more contemporary and soft. I use small quantities from the same brands mentioned above — a sample-size pot (250ml) will often do a single door when used sparingly.
- Brush detail work first (stiles, rails, grooves).
- Roll larger flat areas with light, overlapping strokes to avoid roller marks.
- Work top to bottom so any drips move into unpainted areas you’ll cover immediately.
If you’re doing a very dark or bright colour over cream or bare wood, a second coat may be needed. I usually wait 2–4 hours between coats (depending on the paint) and touch up any missed areas after the second coat has dried.
Finishing touches that look intentional
Once the paint is dry, remove masking tape carefully at a 45-degree angle. If you removed hardware, reinstall it. A new or polished doorknocker, house numbers, or a simple door mat can make the result feel more considered without adding much cost.
| Small upgrade | Approx cost | Why I like it |
|---|---|---|
| Polished brass doorknob | £10–£20 second-hand | Adds charm and draws the eye |
| New house number | £3–£8 | Instant personality and visibility |
| Fresh mat | £5–£15 | Ties the look together and keeps paint clean |
My afternoon timetable (realistic)
Here’s the rough schedule I follow — it fits into an afternoon without rushing:
- 0:00–0:30 — Prep, masking, and initial scraping.
- 0:30–1:00 — Sanding and filling.
- 1:00–1:30 — Allow fillers to dry; clean up dust and take a tea break.
- 1:30–2:00 — Prime main areas and trims.
- 2:00–3:00 — First coat of topcoat; tidy edges.
- 3:00–4:00 — Second coat if needed, remove tape, refit hardware.
With focus and a bit of patience, the whole job rarely needs more than one relaxed afternoon. I love how such a modest investment — often close to £20 if you already have some basics — can refresh the look of a home and give a surprising confidence boost. If you try it, I’d love to hear which colour you chose or what small upgrade made the biggest difference for your doorway. Drop a note on Restoring Daisy at https://www.restoringdaisy.co.uk — small steps, gentle changes, and a brighter everyday life.